
Connecting PowerSchool Data to Google Sheets Part 4: The Google Code and Final Sheet
Google Apps Script, PowerSchool, PSUGS, PowerQueries, API, TheKitchenSink


To complete this, you will need to understand how to add Google Apps Script Properties on an Apps Script that spawns from a MEGAGOOGLESHEET (say that like a WWE wrestler and it is funny). If none of that makes sense, do the Google Apps Script Primer or review this resource.
Assuming you reviewed the previous tutorials in this series (Part 1, Part 2, and Part 3), two keys would have been generated in PowerSchool.
In Part 3, you were asked to copy these keys and the PowerQuery name, “org.psugcal.example.students.birthdays”.
Find these three pieces of text now.
Create a new Google Sheet, name it “Birthday”. Name the first tab in the sheet, “Birthdays”.
Open the Apps Script from the menu and proceed to Step 1.
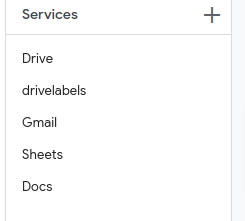
Step 1: Setup the Services & Script Properties
Add these Services
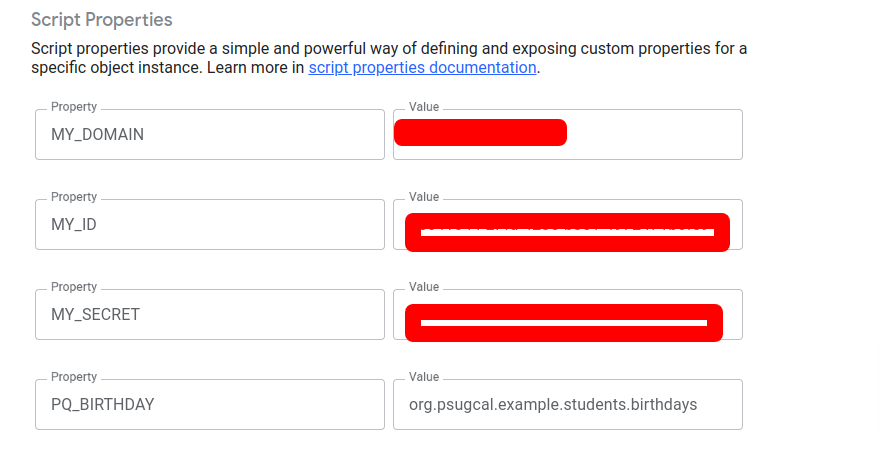
Add your unique values.
Step 2: Add the Constructor File
In the Google Apps Script editor, create a new file called “Constructors” and then paste this code inside it:
//Manage Keys with Script Properties

function myKeyID() {
  try {
    const scriptProperties = PropertiesService.getScriptProperties();
    const myProp = scriptProperties.getProperty('MY_ID');
    return myProp;
  } catch (err) {
    console.log(`Failed getting property "MY_ID": ${err.message}`);
    return null;
  }
}


function myKeySecret() {
  try {
    const scriptProperties = PropertiesService.getScriptProperties();
    const myProp = scriptProperties.getProperty('MY_SECRET');
    return myProp;
  } catch (err) {
    console.log(`Failed getting property "MY_SECRET": ${err.message}`);
    return null;
  }
}


//My Domain

function myDomain() {
  try {
    const scriptProperties = PropertiesService.getScriptProperties();
    const myProp = scriptProperties.getProperty('MY_DOMAIN');
    return myProp;
  } catch (err) {
    console.log(`Failed getting property "MY_DOMAIN": ${err.message}`);
    return null;
  }
}


//My PowerQueries

//My Domain

function myPQBirthday() {
  try {
    const scriptProperties = PropertiesService.getScriptProperties();
    const myProp = scriptProperties.getProperty('PQ_BIRTHDAY');
    return myProp;
  } catch (err) {
    console.log(`Failed getting property "PQ_BIRTHDAY": ${err.message}`);
    return null;
  }
}
This code allows you to access your script properties. For example if I call myPQBirthday, I get the PowerQuery name stored in Script Properties.
Step 3: Add the PSGoogle Script
Aside from optional formatting and functions that might use this data, this is the last step.
In the Apps Script editor, create a new file called “PSGoogle”.
Copy and paste this code into that file:
function onOpen() {
  var ui = SpreadsheetApp.getUi(); // Get the user interface object to add a custom menu
  ui.createMenu('Run Birthdays')
      .addItem('Build Sheet', 'main') // Adds an item to the custom menu
      .addToUi(); // Adds the custom menu to the UI
}


function main() {
  const apiData = getOAuthToken();
 // Logger.log(apiData);
  theApiToSheet(apiData);
}


function getOAuthToken() {

  var getMyDomain = myDomain();
  Logger.log(getMyDomain);

  // Step 1: Get OAuth Token
  var tokenUrl = getMyDomain+'/oauth/access_token';
  var tokenPayload = "grant_type=client_credentials"; // URL-encoded payload as string

  var getMyID = myKeyID();
  var getMySecret = myKeySecret();

  var basicAuth = Utilities.base64Encode(getMyID+':'+getMySecret);
  //Logger.log(basicAuth);
  var tokenOptions = {
    "method": "post",
    "payload": tokenPayload,
    "headers": {
      "Authorization": "Basic " + basicAuth,
      "Content-Type": "application/x-www-form-urlencoded"
    }
  };


  var geyMyPQBirthday = myPQBirthday();

  var apiUrl = getMyDomain +'/ws/schema/query/'+ geyMyPQBirthday +'?pagesize=0';
  var tokenResponse = UrlFetchApp.fetch(tokenUrl, tokenOptions);
  var tokenData = JSON.parse(tokenResponse.getContentText());
  var accessToken = tokenData.access_token;

/* For filtering and testing, follow this template
var apiPayload = JSON.stringify({
  "student_id": "125414"  // Replace with the actual student ID
});*/

var apiOptions = {
  "method": "post",

  "headers": {
    "Authorization": "Bearer " + accessToken,
    "Content-Type": "application/json",
    "Accept": "application/json"
  }
};

 var apiResponse = UrlFetchApp.fetch(apiUrl, apiOptions);


 Logger.log(apiResponse);

 return JSON.parse(apiResponse.getContentText());

}

function theApiToSheet(apiData) {
  const studentsArray = apiData.record;
  const sheet = SpreadsheetApp.getActiveSpreadsheet().getSheetByName("Birthdays");

  if (!sheet) {
    SpreadsheetApp.getActiveSpreadsheet().insertSheet("Birthdays");
}

sheet.clear();
sheet.appendRow(['ID', 'Name', 'Birthdate', 'Age (Years)', 'Month/Day', 'Grade Level']); // Headers

const rows = []; // Initialize array for rows
for (const studentObject of studentsArray) { // Loop through studentsArray
    try {
        // Directly use properties from each studentObject
        const row = [
            studentObject.id,
            studentObject.name,
            studentObject.birthdate,
            studentObject.age_years,
            studentObject.month_day,
            studentObject.grade_level
        ];
        rows.push(row); // Push row into array
    } catch (e) {
        Logger.log(`Error: ${e}`);
    }
}

if (rows.length > 0) {
    // Write all rows to the sheet at once
    sheet.getRange(2, 1, rows.length, rows[0].length).setValues(rows);
}

}
Save the file, and then test it by running, getOAuthToken().
You should see some output in the console if it is working, or you will get errors. The first time you do this you will need to enable the permissions. Those will popup in various boxes.
If it works, close Apps Script, and refresh the spreadsheet. A new menu item should apprear on the right:
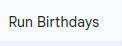
Click that and run the nested item you see. If everything works, the birthdays should start apprearing in the sheet. The sheet auto clears.
The current sheet writing method is append. This is not good for large data sets (more than 500 records).
If you have more than 500 records, you need to use a push method. I will document that in a more general tutorial later.
Copyright © Domain Seven LLC. All rights reserved.
For permissions to use or share any content behind our paywall, please email us at: tonydeprato@domain7.tech .
This is great! Thank you!